

OnlineMeeting Plugin
The OnlineMeeting Plugin helps teams automate the process of scheduling and managing online meetings directly within their workflows. Instead of manually creating meetings and sending invites, users can set up automated actions that handle everything—from deciding when a meeting should be scheduled to sending meeting invitations to the right participants.
Whether it’s triggered through campaigns, form submissions, or manual actions, the plugin ensures meetings are created using the appropriate connected account and shared instantly with attendees. This makes it especially useful for marketing, sales, and support teams who regularly coordinate calls with contacts.
The plugin is designed to work seamlessly with popular meeting providers such as Google Meet, Microsoft Teams and Zoom, while also allowing flexibility to integrate additional providers through its extensible architecture.
Overall, the OnlineMeeting Plugin streamlines meeting scheduling, reduces manual effort, and enables teams to scale their communication workflows efficiently without missing important interactions.
Installation & Setup
Prerequisites
- Administrative access to install plugins.
- Composer (if plugin dependencies are managed externally).
Installation Steps
- Copy the OnlineMeetingPlugin into the application's plugins/ directory
- Run the following commands:
php bin/console cache:clear
php bin/console mautic:assets:generate
- Log in to the application’s admin panel
- Navigate to Settings → Plugins
- Locate the plugin and configure:
- Select the desired Meeting Provider(eg: Google Meet)
- Enter the corresponding app’s id and secret
- Click save & close.
Signing into the Meeting Provider
To start scheduling meetings, you first need to connect a meeting provider account. The plugin supports popular providers such as Google Meet, Microsoft Teams and Zoom, and allows both organization-level and user-level connections.
Connecting an Organization (Global) Account
An organization account is used when meetings should be scheduled from a central account rather than individual users.
- Go to Settings → Configuration → Online Meeting Settings
- You will see available provider cards (e.g., Google Meet, Teams, Zoom)
- Select your preferred provider
- Click “Sign in” on the provider card
- Complete the authentication process in the popup window
- Once connected, the card will display the active account details
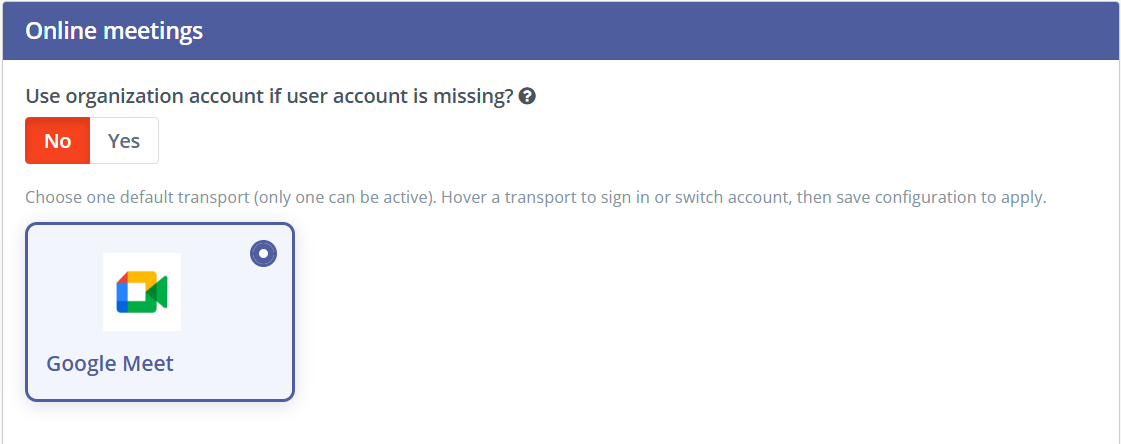
You can also:
- Switch account if needed
- Disconnect the account at any time
- Allow fallback if user-specific account is not available
Connecting a User Account
Each user can connect their own meeting account for personalized scheduling (for example, meetings created on behalf of the contact owner).
- 1. Edit your User Profile
- 2.Navigate to the Online Meeting Connections section
- 3.Choose your preferred provider
- 4.Click “Sign in” and complete authentication
- 5.Save your profile
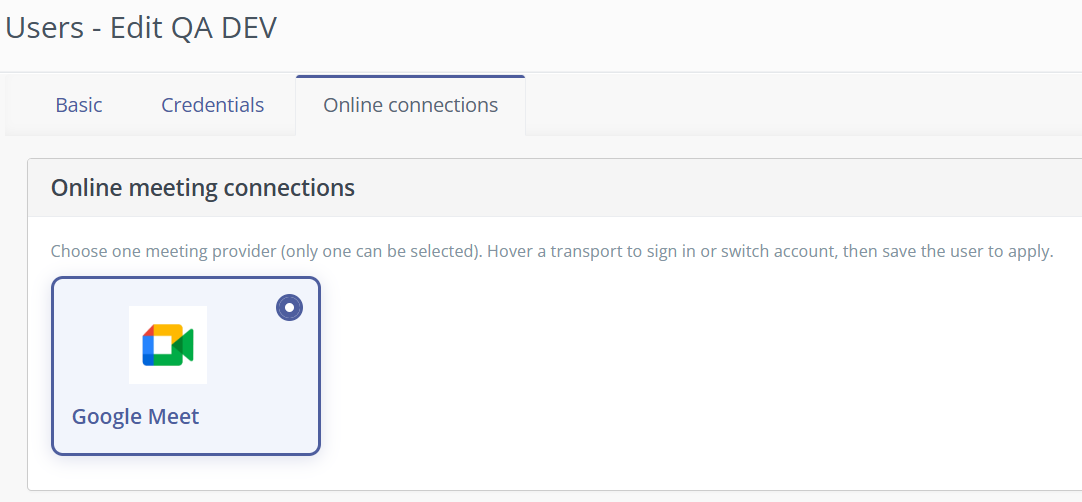
Once connected, meetings can be scheduled using your personal account, depending on campaign or action settings.
How Account Selection Works
When a meeting is scheduled, the plugin automatically determines which account to use based on configuration:
- User account (if selected and available)
- Organization account (if fallback is enabled or selected)
This ensures meetings are always created using the correct credentials without manual intervention.
Notes
- You must complete the sign-in process before using any scheduling features
- If authentication expires or fails, simply reconnect using the same steps
- Permissions may restrict using other users’ accounts depending on system configuration
Scheduling a Meet
The OnlineMeeting Plugin provides multiple ways to schedule meetings, allowing teams to choose the method that best fits their workflow. Whether you want to schedule a meeting for a single contact or automate it across large groups, the plugin offers flexible options to handle different use cases.
Meetings can be scheduled in the following ways:
- Directly with a Contact Schedule a meeting from an individual contact’s profile. This is ideal for one-to-one interactions where a quick meeting needs to be arranged without setting up a campaign or form.
- Bulk Contacts Schedule meetings for multiple selected contacts at once. This helps save time when reaching out to a group of contacts while still allowing control over attendees and meeting details.
- With a Segment Schedule meetings for all contacts within a specific segment. This is useful for targeting a defined audience group, such as leads from a campaign or a filtered contact list.
- Form Actions Automatically schedule a meeting when a contact submits a form. This is commonly used for demo requests, consultations, or sign-ups where an immediate follow-up meeting is required.
- Campaign ActionsSchedule meetings as part of an automated campaign workflow. Meetings can be triggered based on user behavior, timelines, or specific conditions, enabling structured and scalable engagement.
Scheduling a Meeting with Contacts
The OnlineMeeting Plugin allows you to schedule meetings directly from the Contacts section, either for a single contact or for multiple contacts at once. This makes it easy to quickly arrange meetings without needing to navigate to campaigns or forms.
Individual Contact Scheduling
You can schedule a meeting for a single contact using the following options:
- From Contact List Actions In the contacts list, use the action dropdown available next to a contact and select “Schedule Meeting”.
- From Contact Detail View Open the contact’s profile and click on the “Schedule Meeting” option available alongside other actions.
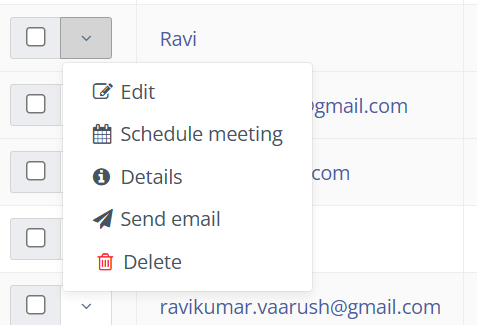
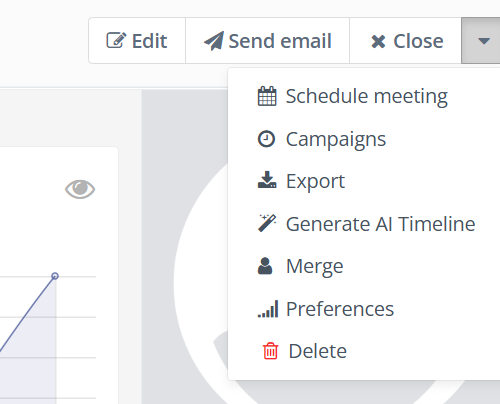
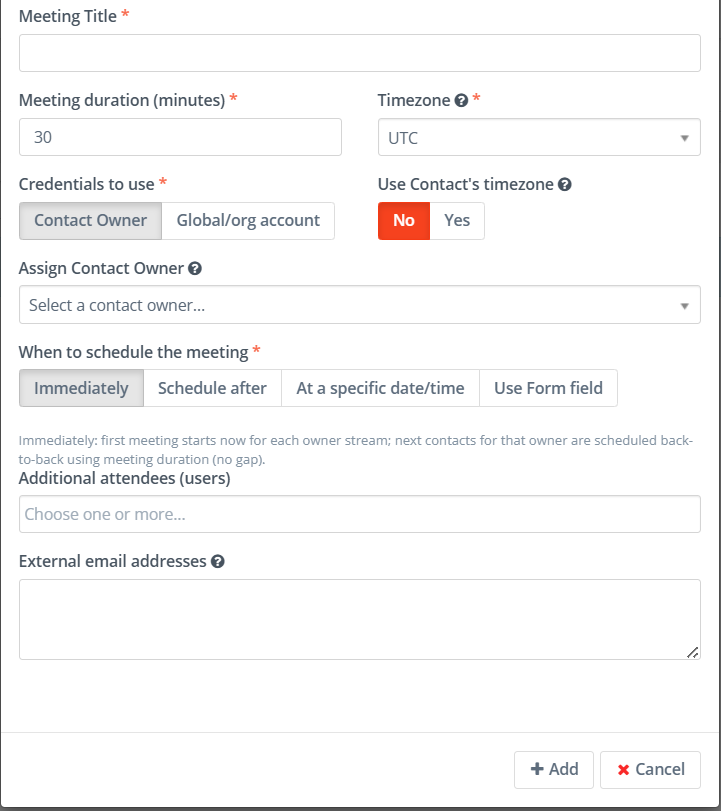
Once selected, a scheduling popup will appear where you can define meeting details such as date, time, duration, attendees, and credentials. This method is best suited for one-to-one interactions like follow-ups, demos, or support discussions.
Bulk Contact Scheduling
You can also schedule meetings for multiple contacts simultaneously using bulk actions:
- Navigate to the Contacts List
- Select multiple contacts using the checkboxes
- Choose the bulk action
- Click on “Schedule Meeting”
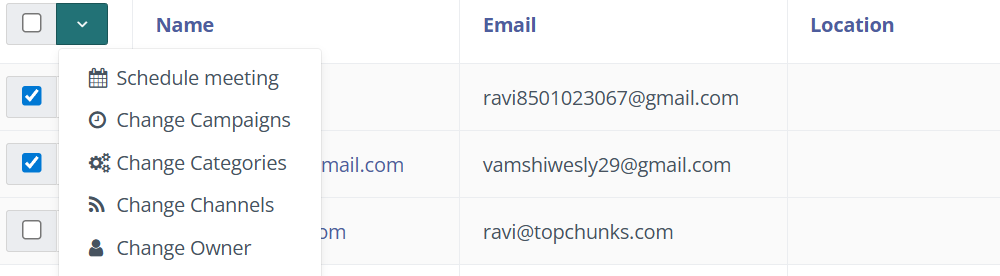
A scheduling popup will open, preloading the selected contacts as recipients. You can review, add, or remove attendees before confirming the meeting.
This method is ideal for reaching out to a group of contacts efficiently while maintaining consistent meeting details across all recipients.
Scheduling a Meeting with Segments
The OnlineMeeting Plugin allows you to schedule meetings for an entire group of contacts using segments. This is useful when you want to target a specific audience—such as qualified leads, event attendees, or a filtered contact group—without selecting each contact individually.
To schedule a meeting with a segment:
- Navigate to the Segments section
- Open the desired segment or use the segment list view
- Select the “Schedule Meeting” option available in the actions
- Configure the meeting details in the popup (date, time, duration, external attendees, and credentials)
- Confirm to schedule the meeting
- Here bulk action isn’t supported.
All contacts within the selected segment will be considered for meeting scheduling. The system will automatically use their available details (such as email and timezone, if configured) to send out invitations.
This approach is ideal for running structured outreach to a defined audience group while ensuring consistency in meeting setup. It eliminates the need for manual selection and helps scale scheduling efforts efficiently across larger contact lists.
Scheduling a Meet with Form Action
The OnlineMeeting Plugin allows you to automatically schedule meetings when a contact submits a form. This is especially useful for scenarios like demo requests, consultation bookings, event registrations, or any situation where a user is expecting a follow-up meeting after submitting their details.
Instead of manually reaching out and scheduling meetings, this feature ensures that the process is handled instantly and consistently.
How It Works
When a contact fills out and submits a form, the plugin can automatically trigger meeting scheduling based on the configuration you define. The meeting is created using the selected account and invitations are sent to the contact and any additional participants.
This helps reduce response time and ensures no opportunity is missed.
Setting Up Form-Based Meeting Scheduling
To enable this feature:
- 1.Go to the Form Builder
- 2.Create a new form or edit an existing one
- 3.Navigate to the Actions section
- 4.Add a new action called “Schedule Online Meeting”
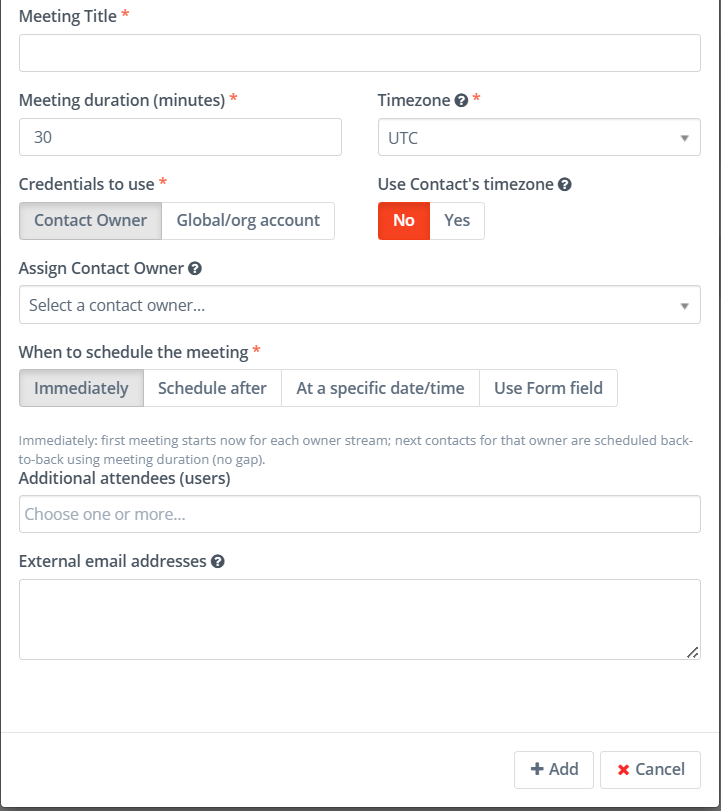
- 5.Configure the meeting details such as:
- Meeting title and description
- Duration (meeting duration)
- Credentials (contact owner or organization account)
- Additional attendees (if required)
- External email addresses (if required)
- Timezone (meetings can be scheduled in this timezone for all modes except Form Field datetime because it’ll use contacts timezone to schedule a meet )
Choosing When the Meeting Should Be Scheduled
The plugin provides flexible options to decide when the meeting should take place:
- Immediately
- The meeting is scheduled as soon as the form is submitted.
- After a Delay
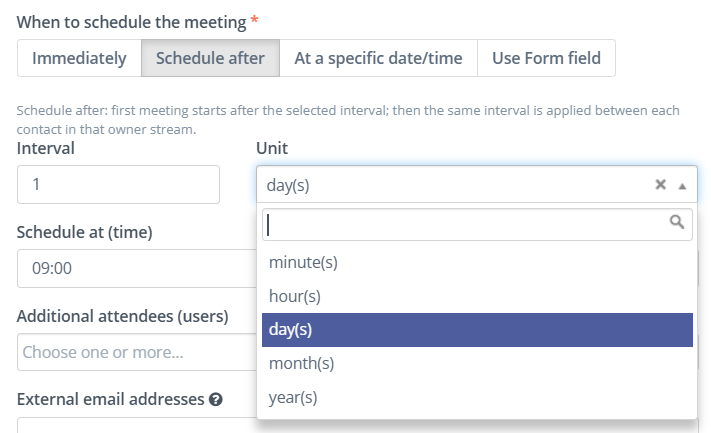
- You can set a delay of time to schedule meeting after form submission for eg: if you set a delay of 1 hour and a contact is submitted form at 10:00 then meet will be scheduled at 11:00
- And you can see available units in the picture below.
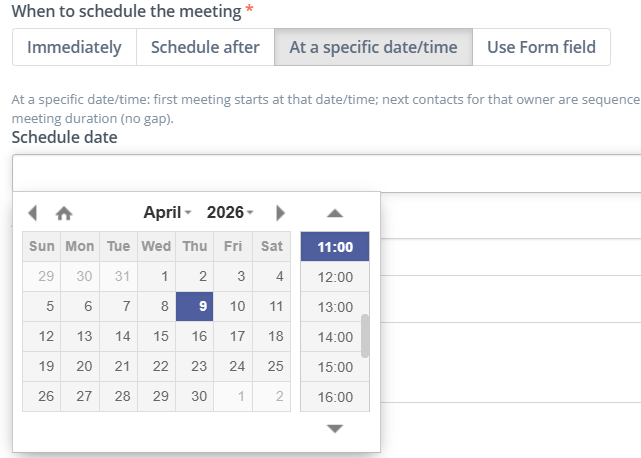
- Specific Date and Time
- Set a fixed date time to schedule a meet for the submissions
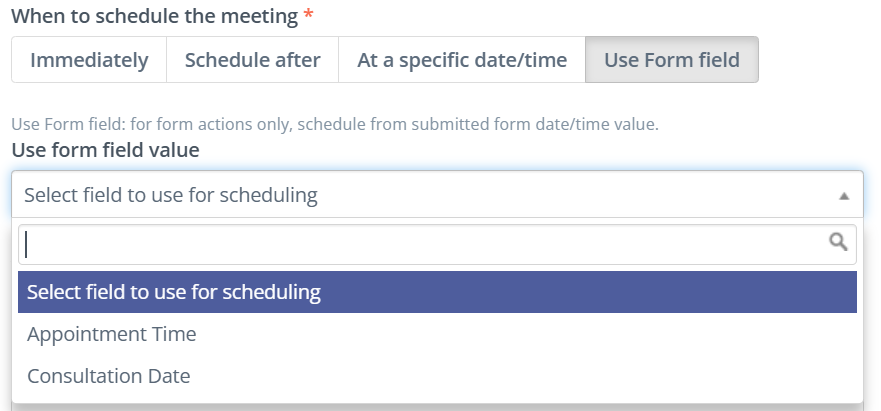
- Using Form Field Values
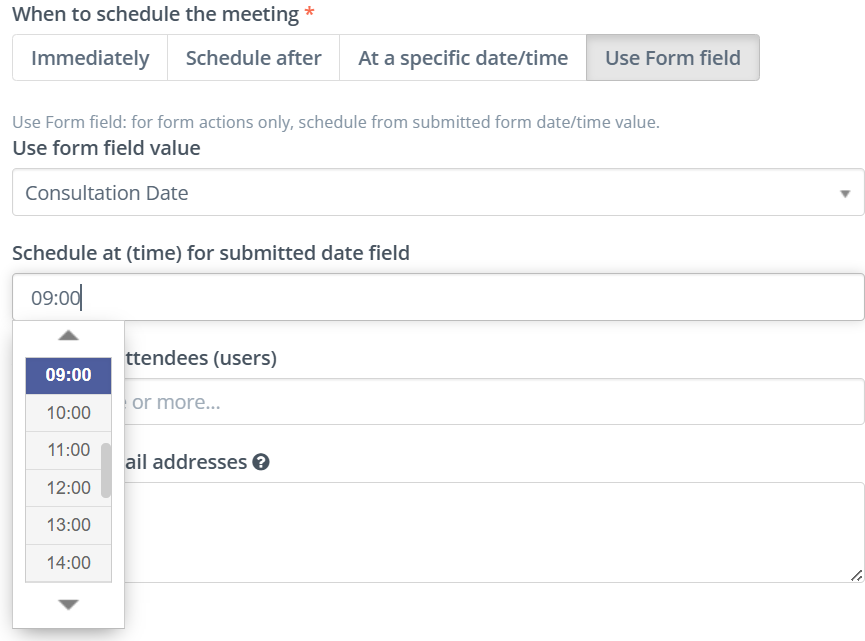
- If your form includes fields like “Preferred Date” or “Preferred Date Time,” the plugin can use those values to schedule the meeting accordingly with the contact’s timezone if datetimefield is used in the form.
- Or if only data is used in the form then admin can choose the timezone and the schedule time accordingly.
Timezone Handling
The plugin intelligently handles timezones to ensure meetings are scheduled correctly:
- It can detect the user’s browser timezone (if enabled)
- It can use the contact’s saved timezone
- It can fall back to the system default timezone if needed
This ensures that meetings are scheduled at the correct time for both your team and the contact.
When to Use This Feature
Form-based scheduling is ideal for:
- Demo or consultation requests
- Lead capture forms with immediate follow-up
- Event or webinar registrations
- Customer onboarding workflows
Benefits
- Eliminates manual scheduling effort
- Provides instant response to user actions
- Ensures consistent meeting setup
- Improves lead engagement and conversion rates
Scheduling a Meeting with Campaign Action
The OnlineMeeting Plugin allows you to schedule meetings automatically as part of your campaign workflows. This means meetings can be triggered based on a contact’s behavior, journey stage, or specific conditions—without any manual effort.
This feature is especially useful for nurturing leads, following up at the right time, and creating structured communication flows.
How It Works
When a contact reaches a specific step in a campaign, the “Schedule Online Meeting” action can automatically create a meeting for that contact. The system determines the timing, selects the appropriate account, and sends out invitations based on your configuration.
This ensures that meetings happen at the right moment in the customer journey.
Setting Up Campaign-Based Meeting Scheduling
To use this feature:
- Go to the Campaign Builder
- Create a new campaign or edit an existing one
- Add an action called “Schedule Online Meeting” at the desired step
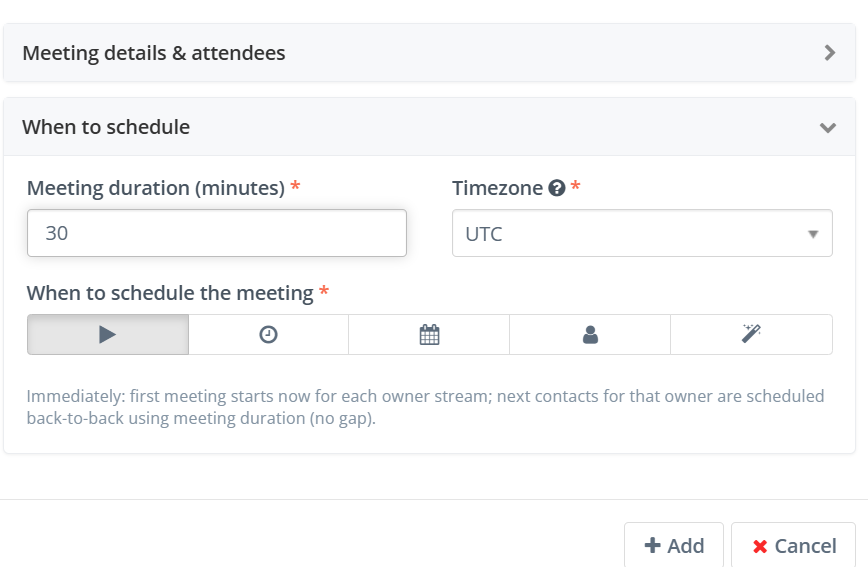
- Configure the meeting details such as:
- Meeting title and description
- Duration
- Credentials (contact owner account or organization account)
- Additional attendees (internal users or external emails)
- Timezone (if contact field mode is selected it’ll use contact’s timezone if available else fall back to selected timezone)
Choosing When the Meeting Should Be Scheduled
Campaign actions provide multiple scheduling options to control when the meeting takes place:
- Immediately
- The meeting is scheduled as soon as the contact reaches this step in the campaign.
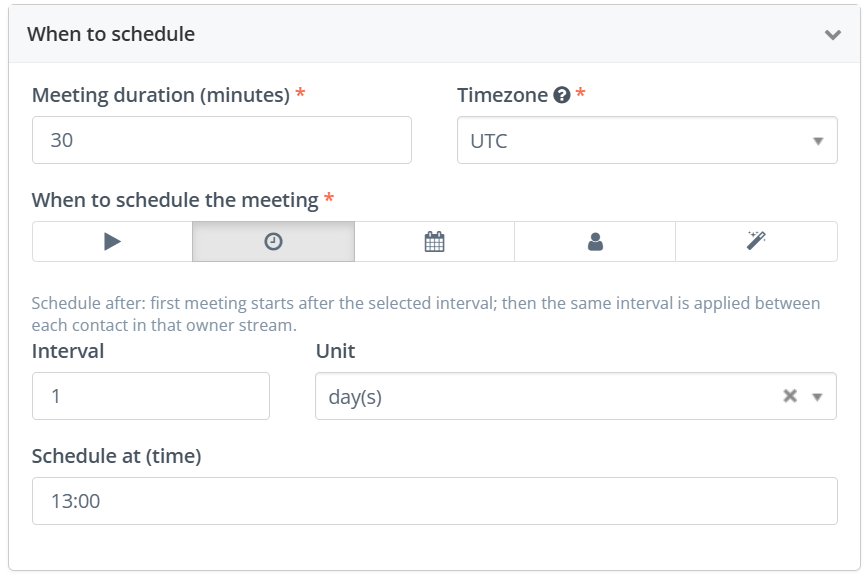
- After a Delay
- Schedule the meeting after a defined time but schedules can be sent by the moment the event triggered (e.g., 1 day after an email is opened or a form is submitted).
- Events can be triggered immediately but scheduling can happen with a defined time.
- Specific Date and Time
- Set a fixed date and time for all contacts in the campaign.
- Using Contact Field Values
- Schedule meetings based on date or datetime values stored in the contact’s profile.
Smart Scheduling (Advanced Meeting Distribution)
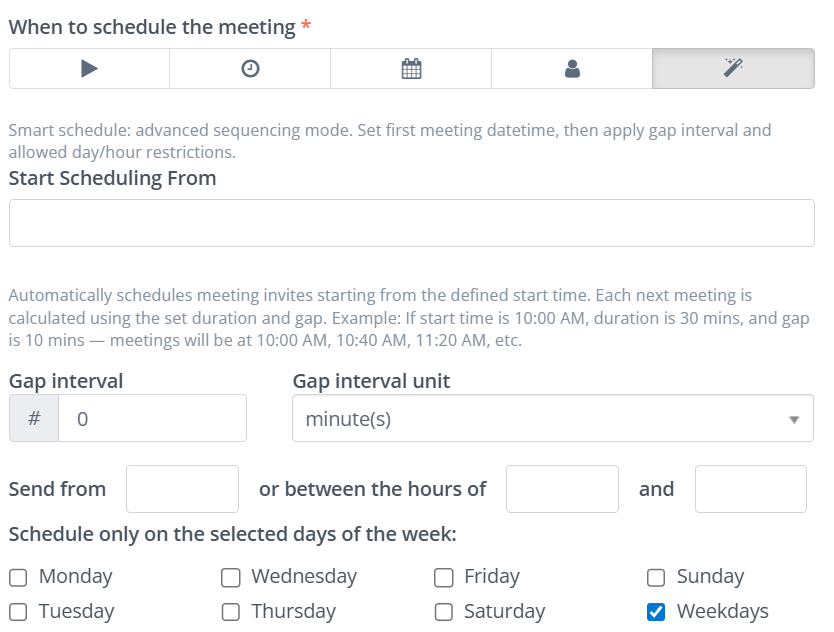
The Smart Scheduling option is designed to handle meeting bookings at scale in a structured and organized way. Instead of scheduling all meetings at the same time or manually spacing them out, this feature automatically distributes meetings across contacts based on defined rules such as start time, duration, gap intervals, working hours, and allowed days.
How Smart Scheduling Works
When Smart Scheduling is enabled, the system follows a sequence-based approach:
- A start date and time is defined
- Each meeting is assigned a fixed duration
- A gap interval is applied between consecutive meetings
- Meetings are distributed across contacts automatically
For example:
If the start time is 10:00 AM, duration is 30 minutes, and gap is 10 minutes, meetings will be scheduled like:
- 10:00 AM – 10:30 AM
- 10:40 AM – 11:10 AM
- 11:20 AM – 11:50 AM
…and so on.
Handling Multiple Contacts and Owners
This becomes more powerful when used with segments and multiple users:
- Suppose a segment contains 100 contacts
- Each contact is assigned to a contact owner
- There are 5 users (owners) in the system
- The meeting action is configured to use Contact Owner Credentials
In this case:
- Meetings are distributed among the 5 users based on contact ownership
- Each user gets meetings scheduled only for their assigned contacts
- Scheduling happens independently per user, avoiding overlap within their own calendar
- The defined start time, duration, and gap rules are applied separately for each owner
This ensures balanced workload distribution and avoids conflicts in individual calendars.
Time Window Control
You can further refine scheduling using time constraints:
- Send From / Time Range
Define working hours (e.g., 10:00 AM to 6:00 PM)
Meetings will only be scheduled within this time window - If the time exceeds the allowed range, scheduling continues on the next valid time slot
Day Restrictions
You can control which days meetings are allowed:
- Select specific days (e.g., Monday to Friday)
- Exclude weekends or non-working days
- Option to quickly apply Weekdays only
If a meeting falls outside allowed days, it will automatically move to the next valid day
Key Benefits
- Automatically handles large volumes of contacts
- Prevents meeting overlaps for individual users
- Ensures meetings are scheduled within working hours
- Distributes workload fairly across team members
- Eliminates the need for manual planning and coordination
When to Use Smart Scheduling
This feature is ideal when:
- Scheduling meetings for large segments or campaigns
- Lead nurturing workflows
- Automated follow-ups after specific actions (e.g., email clicks, page visits)
- Sales pipeline stages (e.g., booking a call after qualification)
- Customer engagement and retention campaigns
- Multiple team members are involved in handling meetings
- You want to maintain consistent gaps and avoid overload
- You need meetings to follow business hours and working days
Smart Scheduling ensures that meetings are not just automated, but also intelligently planned—making it easier to manage time, resources, and customer interactions efficiently.